After joseki:capturing race of corner and edge
- Takumigo
- Aug 5, 2024
- 3 min read


The Theme of This Article is to Introduce the capturing race on the Top Side in the Diagram.
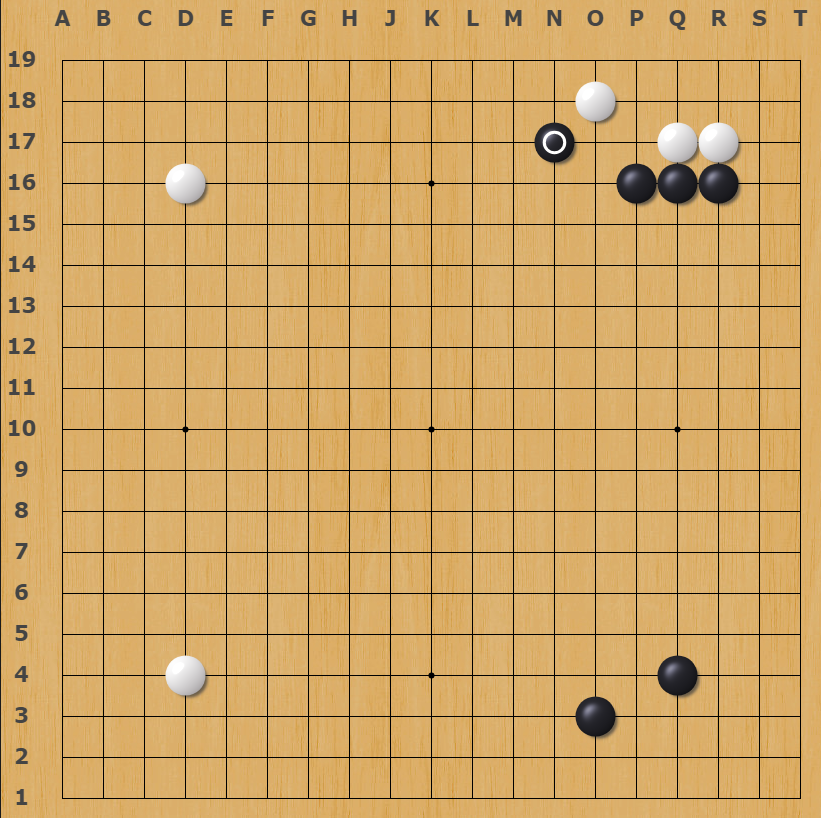
This local position arises from the 3-3 invasion followed by Black's knight's move. White's responses in this local position are numerous, and ignoring it (tenuki) is also an option.

After White 2 pushes and clamps at 4, this is one of the variations.

If Black connects at 5, then both sides are fine...

If black has support, black will counter-attack by pushing at 5, how should the situation be handled? And what happens if Black has no support?

After Black 5 pushes, White 6 cuts, and from Black 7 onwards, Black needs to keep crawling along the second line. A key question is when White can hane on the second line.

After White hane, not only will there be cutting points at A and B, but also a clamping move at point C. Combined with the capturing race in the corner, the situation becomes very complex. This article will focus on discussing the capturing race in the corner.

Black has seven stones on the top side, and Black plays first. What is the result in the corner?
~~~~~~ANSWER ~~~~~~
~~~~~~ANSWER ~~~~~~
~~~~~~ANSWER ~~~~~~
~~~~~~ANSWER ~~~~~~
~~~~~~ANSWER ~~~~~~

Black can win by playing moves 1 and 3. White has three possible responses at A, B, and C, but Black can win in all cases.


If White stands, Black 2 can place in (an important tesuji to remember!).

If White bends at 1, Black 2 can still place in.

After Black 2 atari and then pushes at 4, this is not good because it leaves an approach ko fight issue in the future, so black 2 should place in at R19 directly.

It leaves an approach ko fight issue in the future.

If White connects at 1, which is the strongest local move, Black can respond with moves 2 and 4.

After Black 8, A and B form miai (mutually exclusive options).

Now, the question is with six stones. If Black plays first, what is the result in the corner?
~~~~~~ANSWER ~~~~~~
~~~~~~ANSWER ~~~~~~
~~~~~~ANSWER ~~~~~~
~~~~~~ANSWER ~~~~~~
~~~~~~ANSWER ~~~~~~

The first four moves are the same.

However, Black cannot use the method of moves 1 and 3, as there is no miai on the side to live, and Black will not have enough liberties in the capturing race.

Black 1 is a brilliant move, forcing White into a ko fight.

If White stands or hane to block the connection, Black cuts to create a ko fight.

If White kick to block...

White does not have enough liberties, and it still results in a ko fight.

If Black has only five stones, is there a move? Black plays first.
~~~~~~ANSWER ~~~~~~
~~~~~~ANSWER ~~~~~~
~~~~~~ANSWER ~~~~~~
~~~~~~ANSWER ~~~~~~
~~~~~~ANSWER ~~~~~~

Can Black use the same technique again?

No, White has the advantage in the capturing race.

This approach ko is not the correct solution.

In this case, Black’s double connection with 3 and 5 is a strong move, opening a path for Black.

White 6 has to connect, and Black 7 pursues!

After Black 7, White’s cut leads to a trade. (Note that from a practical perspective, Black’s crawl on the second line to capture the three stones is inefficient and is a last-resort move. If Black has six or seven stones on the side, Black would not use this method.)

If White doesn’t compromise at 1, it results in a ko fight in the corner.

If Black has only four stones... Is there no move for Black?
~~~~~~ANSWER ~~~~~~
~~~~~~ANSWER ~~~~~~
~~~~~~ANSWER ~~~~~~
~~~~~~ANSWER ~~~~~~
~~~~~~ANSWER ~~~~~~

Black's strongest move is still the double connection.

White captures cleanly, but Black can still profit with sente.

In the next chapter, we will continue to explore when Black can seize point A, and conversely, when White should play point B to take the initiative.


Comments